.png.ed69a7260a477fcf4feead7a0e4b7506.png)

jack
-
Posts
1,922 -
Joined
-
Last visited
-
Days Won
3
Reputation Activity
-

 jack got a reaction from LucyXpher in Ban Thread
I say we forget this happened and share pictures of puppies.
-

 jack got a reaction from Scurvy in Jack's Guide to Making Neat Sigs
0.0 - Introduction
To begin, I'm not calling myself the god of sigs, but I do think I have improved a lot since my return to the VHL earlier this year. Hopefully this thread can help out some people struggling to consistently create nice sigs.
Here we go.
1.0 - Composition
The difference between a good sig and a fantastic sig often lies in its composition. That is, its layout of the elements, and its flow. There are a few key things to note in this category, and these things are easy to do.
1.1 - Rule of Thirds
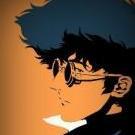
The rule of thirds states that interesting elements and focal points should be on the intersecting points of a 3x3 grid.
In the following sig, the render's face and logo are on an intersecting point, as well as the text.
The main thing to note here is that you shouldn't put stuff in the dead centre.
1.2 - Depth
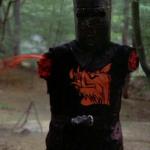
Depth in a sig is what makes it seem complete. To create depth, you will usually need a combination of stocks and effects.
In this sig, the foreground is the render and the some surrounding area. The background is a bit of the left and the rest of the right. The depth comes from the "bokeh" effect, or simple stated, the blur. An easy way to create depth is to make a layer on top of everything else when you're done, and Gaussian Blur it between 1px and 2px. Erase (or mask) the parts that you want to be in focus, mainly your render and the text.
2.0 - Stocks
Stocks, put simply, are photographs or digital images of anything that you put in your sig to make it look cool.
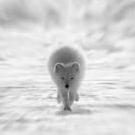
This is one of my sigs without the render or text.
Some of the stocks in there are splatters, c4ds, or lighting effects (Click those links to find thousands of examples.)
Other stocks include landscapes, patterns or just cool pictures.
Many often get messed up with the sort of blend modes they're supposed to use for a stock. Best advice here is to experiment, but the most common blend modes are Soft Light, Overlay, Screen/Lighten, Multiply/Darken and occasionally Color Burn/Color Dodge.
A good trick for when a stock is too intense is to play with its Levels instead of its Opacity. Hit Ctrl+L (Cmd+L) when you are on that layer and adjust the middle slider until it looks good. And never be afraid to erase ugly parts!
3.0 - Text
Text is often the biggest issue for sig makers. Many simply don't put in enough effort, and many don't know what effort to put in.
One simple thing to do is give it a background.
This will give the text some substance, and make it easier to read.
Don't be scared of hiding some of the text with the render. As long as it is still readable, it can work.
Never be afraid to spice up the text with some flare. Add a bunch of periods or 'x's. Maybe even some small gibberish that is just for aesthetics.
Final tip for text: always try multiple versions. Do three totally different attempts of text on each sig you do, with different fonts, spacing, effects, colouring etc. This is the number one way to improve your text.
4.0 - Assorted Techniques
4.1 - Displacement Maps
Duplicate your render. Go Filter > Distort > Displace. Hit OK or choose some different numbers. Locate an old .psd of yours. This will distort the render into some cool looking formations.
It might look weird here, but if you put it behind your render, it can give a nice effect.
4.2 - Gradient Maps
Seems pretty obvious for experienced sigmakers but it took me a long time to realise Gradient Map didn't mean use the Gradient tool. Hit the Black and White circle at the bottom of the layers panel and choose Gradient Map or go Layer > New Adjustment Layer > Gradient Map. A Gradient Map will map colours to your sig based on the light.
The render on the right has a purple to orange Gradient Map on it set to Soft Light. Mess around with different colours and blend modes to find some interesting effects.
4.3 - Shapes & Lines
Using polygons and lines is one of my favourite techniques. Draw the shape with the polygonal lasso tool or use the Shape Tool.
The triangles in this sig were made using the shape tool and various colours.
4.4 - Color Dodge Dots
Create a new layer and set it to Color Dodge. Choose a soft brush (circular) and set it anywhere from 15px - 100px. Turn on size jitter if you're feeling funky. Choose a color that is on the darker half of the spectrum (halfway down inside the colour picker window). Now just click a few times in spots that need some brightening up.
This.
To this.
(Also did some blurring to this one).
4.5 - Clipping Masks
Clipping masks are using in many different ways. You can use them to isolate an adjustment layer to just on layer, blend in splatter effects, create nice backgrounds or make nice text. Here are a few examples.
A clipping mask, in its basic form, has the colour of one layer aligned to the shape of another. The colour layer is on top of the shape.
In this example, the circle layer is beneath the army pattern layer. To create this, you make the circle layer directly underneath the army pattern layer. Then, right click on the army pattern layer and select 'Create Clipping Mask'.
In this example, the text has a clipping mask of the render.
While in this example, the splatters at the bottom-right and bottom-middle have clipping masks applied to them. The goal of this effect is to have it blend better with the rest of the sig.
Finally, in this sig the large circle is a clipping mask from the left side of the sig.
5.0 - Final Touches to Sigs
There are a few things that I do to nearly every sig I make. These are almost universal to sigs, and should improve many sigs.
Starting point:
5.1 - Hue Layer
Make a new Gradient Map. Make the first colour whatever colour suits your sig, and your second colour black or white (doesn't matter).
5.2 - Exposure Layer
Make a new Exposure layer (Layer > New Adjustment Layer > Exposure). My settings are: Exposure: 0, Offset: +0.0164, Gamma Correction: 0.89.
This makes the dark less overpowering.
5.3 - B/W Layer
Sometimes some coloured parts of a sig should grab less attention. An easy way to fix this is making that part black and white. Make a new layer and set it to Color. Brush in black anywhere that is drawing too much attention from it's color.
5.4 - High Pass
Make a new layer. Select all (Ctrl + A/Cmd + A) then hit Ctrl + Shift + C/Cmd + Shift + C to copy the entire sig. Then, paste it on the new layer (Ctrl + V/Cmd + V). Then go Filter > Other > High Pass and set it anywhere from 10px to 100px. Set this on Soft Light or Overlay and mess around with its Opacity.
5.5 - Blur
Finally, to create some depth, I again go through the steps of copying the whole sig and pasting it (another way to do this is making a new layer and going Image > Apply Image). Then I go Filter > Blur > Gaussian Blur and set it between 1px and 2px. Erase the render and text and other details that should remain sharp.
6.0 - Conclusion
Hopefully this helps some people in their sig making. If you have any questions or suggestions, feel free to reply. I will likely add to this later as well.
-
 jack got a reaction from Subject056 in Jack's Guide to Making Neat Sigs
0.0 - Introduction
To begin, I'm not calling myself the god of sigs, but I do think I have improved a lot since my return to the VHL earlier this year. Hopefully this thread can help out some people struggling to consistently create nice sigs.
Here we go.
1.0 - Composition
The difference between a good sig and a fantastic sig often lies in its composition. That is, its layout of the elements, and its flow. There are a few key things to note in this category, and these things are easy to do.
1.1 - Rule of Thirds
The rule of thirds states that interesting elements and focal points should be on the intersecting points of a 3x3 grid.
In the following sig, the render's face and logo are on an intersecting point, as well as the text.
The main thing to note here is that you shouldn't put stuff in the dead centre.
1.2 - Depth
Depth in a sig is what makes it seem complete. To create depth, you will usually need a combination of stocks and effects.
In this sig, the foreground is the render and the some surrounding area. The background is a bit of the left and the rest of the right. The depth comes from the "bokeh" effect, or simple stated, the blur. An easy way to create depth is to make a layer on top of everything else when you're done, and Gaussian Blur it between 1px and 2px. Erase (or mask) the parts that you want to be in focus, mainly your render and the text.
2.0 - Stocks
Stocks, put simply, are photographs or digital images of anything that you put in your sig to make it look cool.
This is one of my sigs without the render or text.
Some of the stocks in there are splatters, c4ds, or lighting effects (Click those links to find thousands of examples.)
Other stocks include landscapes, patterns or just cool pictures.
Many often get messed up with the sort of blend modes they're supposed to use for a stock. Best advice here is to experiment, but the most common blend modes are Soft Light, Overlay, Screen/Lighten, Multiply/Darken and occasionally Color Burn/Color Dodge.
A good trick for when a stock is too intense is to play with its Levels instead of its Opacity. Hit Ctrl+L (Cmd+L) when you are on that layer and adjust the middle slider until it looks good. And never be afraid to erase ugly parts!
3.0 - Text
Text is often the biggest issue for sig makers. Many simply don't put in enough effort, and many don't know what effort to put in.
One simple thing to do is give it a background.
This will give the text some substance, and make it easier to read.
Don't be scared of hiding some of the text with the render. As long as it is still readable, it can work.
Never be afraid to spice up the text with some flare. Add a bunch of periods or 'x's. Maybe even some small gibberish that is just for aesthetics.
Final tip for text: always try multiple versions. Do three totally different attempts of text on each sig you do, with different fonts, spacing, effects, colouring etc. This is the number one way to improve your text.
4.0 - Assorted Techniques
4.1 - Displacement Maps
Duplicate your render. Go Filter > Distort > Displace. Hit OK or choose some different numbers. Locate an old .psd of yours. This will distort the render into some cool looking formations.
It might look weird here, but if you put it behind your render, it can give a nice effect.
4.2 - Gradient Maps
Seems pretty obvious for experienced sigmakers but it took me a long time to realise Gradient Map didn't mean use the Gradient tool. Hit the Black and White circle at the bottom of the layers panel and choose Gradient Map or go Layer > New Adjustment Layer > Gradient Map. A Gradient Map will map colours to your sig based on the light.
The render on the right has a purple to orange Gradient Map on it set to Soft Light. Mess around with different colours and blend modes to find some interesting effects.
4.3 - Shapes & Lines
Using polygons and lines is one of my favourite techniques. Draw the shape with the polygonal lasso tool or use the Shape Tool.
The triangles in this sig were made using the shape tool and various colours.
4.4 - Color Dodge Dots
Create a new layer and set it to Color Dodge. Choose a soft brush (circular) and set it anywhere from 15px - 100px. Turn on size jitter if you're feeling funky. Choose a color that is on the darker half of the spectrum (halfway down inside the colour picker window). Now just click a few times in spots that need some brightening up.
This.
To this.
(Also did some blurring to this one).
4.5 - Clipping Masks
Clipping masks are using in many different ways. You can use them to isolate an adjustment layer to just on layer, blend in splatter effects, create nice backgrounds or make nice text. Here are a few examples.
A clipping mask, in its basic form, has the colour of one layer aligned to the shape of another. The colour layer is on top of the shape.
In this example, the circle layer is beneath the army pattern layer. To create this, you make the circle layer directly underneath the army pattern layer. Then, right click on the army pattern layer and select 'Create Clipping Mask'.
In this example, the text has a clipping mask of the render.
While in this example, the splatters at the bottom-right and bottom-middle have clipping masks applied to them. The goal of this effect is to have it blend better with the rest of the sig.
Finally, in this sig the large circle is a clipping mask from the left side of the sig.
5.0 - Final Touches to Sigs
There are a few things that I do to nearly every sig I make. These are almost universal to sigs, and should improve many sigs.
Starting point:
5.1 - Hue Layer
Make a new Gradient Map. Make the first colour whatever colour suits your sig, and your second colour black or white (doesn't matter).
5.2 - Exposure Layer
Make a new Exposure layer (Layer > New Adjustment Layer > Exposure). My settings are: Exposure: 0, Offset: +0.0164, Gamma Correction: 0.89.
This makes the dark less overpowering.
5.3 - B/W Layer
Sometimes some coloured parts of a sig should grab less attention. An easy way to fix this is making that part black and white. Make a new layer and set it to Color. Brush in black anywhere that is drawing too much attention from it's color.
5.4 - High Pass
Make a new layer. Select all (Ctrl + A/Cmd + A) then hit Ctrl + Shift + C/Cmd + Shift + C to copy the entire sig. Then, paste it on the new layer (Ctrl + V/Cmd + V). Then go Filter > Other > High Pass and set it anywhere from 10px to 100px. Set this on Soft Light or Overlay and mess around with its Opacity.
5.5 - Blur
Finally, to create some depth, I again go through the steps of copying the whole sig and pasting it (another way to do this is making a new layer and going Image > Apply Image). Then I go Filter > Blur > Gaussian Blur and set it between 1px and 2px. Erase the render and text and other details that should remain sharp.
6.0 - Conclusion
Hopefully this helps some people in their sig making. If you have any questions or suggestions, feel free to reply. I will likely add to this later as well.
-
 jack got a reaction from N0HBDY in Jack's Guide to Making Neat Sigs
0.0 - Introduction
To begin, I'm not calling myself the god of sigs, but I do think I have improved a lot since my return to the VHL earlier this year. Hopefully this thread can help out some people struggling to consistently create nice sigs.
Here we go.
1.0 - Composition
The difference between a good sig and a fantastic sig often lies in its composition. That is, its layout of the elements, and its flow. There are a few key things to note in this category, and these things are easy to do.
1.1 - Rule of Thirds
The rule of thirds states that interesting elements and focal points should be on the intersecting points of a 3x3 grid.
In the following sig, the render's face and logo are on an intersecting point, as well as the text.
The main thing to note here is that you shouldn't put stuff in the dead centre.
1.2 - Depth
Depth in a sig is what makes it seem complete. To create depth, you will usually need a combination of stocks and effects.
In this sig, the foreground is the render and the some surrounding area. The background is a bit of the left and the rest of the right. The depth comes from the "bokeh" effect, or simple stated, the blur. An easy way to create depth is to make a layer on top of everything else when you're done, and Gaussian Blur it between 1px and 2px. Erase (or mask) the parts that you want to be in focus, mainly your render and the text.
2.0 - Stocks
Stocks, put simply, are photographs or digital images of anything that you put in your sig to make it look cool.
This is one of my sigs without the render or text.
Some of the stocks in there are splatters, c4ds, or lighting effects (Click those links to find thousands of examples.)
Other stocks include landscapes, patterns or just cool pictures.
Many often get messed up with the sort of blend modes they're supposed to use for a stock. Best advice here is to experiment, but the most common blend modes are Soft Light, Overlay, Screen/Lighten, Multiply/Darken and occasionally Color Burn/Color Dodge.
A good trick for when a stock is too intense is to play with its Levels instead of its Opacity. Hit Ctrl+L (Cmd+L) when you are on that layer and adjust the middle slider until it looks good. And never be afraid to erase ugly parts!
3.0 - Text
Text is often the biggest issue for sig makers. Many simply don't put in enough effort, and many don't know what effort to put in.
One simple thing to do is give it a background.
This will give the text some substance, and make it easier to read.
Don't be scared of hiding some of the text with the render. As long as it is still readable, it can work.
Never be afraid to spice up the text with some flare. Add a bunch of periods or 'x's. Maybe even some small gibberish that is just for aesthetics.
Final tip for text: always try multiple versions. Do three totally different attempts of text on each sig you do, with different fonts, spacing, effects, colouring etc. This is the number one way to improve your text.
4.0 - Assorted Techniques
4.1 - Displacement Maps
Duplicate your render. Go Filter > Distort > Displace. Hit OK or choose some different numbers. Locate an old .psd of yours. This will distort the render into some cool looking formations.
It might look weird here, but if you put it behind your render, it can give a nice effect.
4.2 - Gradient Maps
Seems pretty obvious for experienced sigmakers but it took me a long time to realise Gradient Map didn't mean use the Gradient tool. Hit the Black and White circle at the bottom of the layers panel and choose Gradient Map or go Layer > New Adjustment Layer > Gradient Map. A Gradient Map will map colours to your sig based on the light.
The render on the right has a purple to orange Gradient Map on it set to Soft Light. Mess around with different colours and blend modes to find some interesting effects.
4.3 - Shapes & Lines
Using polygons and lines is one of my favourite techniques. Draw the shape with the polygonal lasso tool or use the Shape Tool.
The triangles in this sig were made using the shape tool and various colours.
4.4 - Color Dodge Dots
Create a new layer and set it to Color Dodge. Choose a soft brush (circular) and set it anywhere from 15px - 100px. Turn on size jitter if you're feeling funky. Choose a color that is on the darker half of the spectrum (halfway down inside the colour picker window). Now just click a few times in spots that need some brightening up.
This.
To this.
(Also did some blurring to this one).
4.5 - Clipping Masks
Clipping masks are using in many different ways. You can use them to isolate an adjustment layer to just on layer, blend in splatter effects, create nice backgrounds or make nice text. Here are a few examples.
A clipping mask, in its basic form, has the colour of one layer aligned to the shape of another. The colour layer is on top of the shape.
In this example, the circle layer is beneath the army pattern layer. To create this, you make the circle layer directly underneath the army pattern layer. Then, right click on the army pattern layer and select 'Create Clipping Mask'.
In this example, the text has a clipping mask of the render.
While in this example, the splatters at the bottom-right and bottom-middle have clipping masks applied to them. The goal of this effect is to have it blend better with the rest of the sig.
Finally, in this sig the large circle is a clipping mask from the left side of the sig.
5.0 - Final Touches to Sigs
There are a few things that I do to nearly every sig I make. These are almost universal to sigs, and should improve many sigs.
Starting point:
5.1 - Hue Layer
Make a new Gradient Map. Make the first colour whatever colour suits your sig, and your second colour black or white (doesn't matter).
5.2 - Exposure Layer
Make a new Exposure layer (Layer > New Adjustment Layer > Exposure). My settings are: Exposure: 0, Offset: +0.0164, Gamma Correction: 0.89.
This makes the dark less overpowering.
5.3 - B/W Layer
Sometimes some coloured parts of a sig should grab less attention. An easy way to fix this is making that part black and white. Make a new layer and set it to Color. Brush in black anywhere that is drawing too much attention from it's color.
5.4 - High Pass
Make a new layer. Select all (Ctrl + A/Cmd + A) then hit Ctrl + Shift + C/Cmd + Shift + C to copy the entire sig. Then, paste it on the new layer (Ctrl + V/Cmd + V). Then go Filter > Other > High Pass and set it anywhere from 10px to 100px. Set this on Soft Light or Overlay and mess around with its Opacity.
5.5 - Blur
Finally, to create some depth, I again go through the steps of copying the whole sig and pasting it (another way to do this is making a new layer and going Image > Apply Image). Then I go Filter > Blur > Gaussian Blur and set it between 1px and 2px. Erase the render and text and other details that should remain sharp.
6.0 - Conclusion
Hopefully this helps some people in their sig making. If you have any questions or suggestions, feel free to reply. I will likely add to this later as well.
-

 jack got a reaction from Brandon in Jack's Guide to Making Neat Sigs
0.0 - Introduction
To begin, I'm not calling myself the god of sigs, but I do think I have improved a lot since my return to the VHL earlier this year. Hopefully this thread can help out some people struggling to consistently create nice sigs.
Here we go.
1.0 - Composition
The difference between a good sig and a fantastic sig often lies in its composition. That is, its layout of the elements, and its flow. There are a few key things to note in this category, and these things are easy to do.
1.1 - Rule of Thirds
The rule of thirds states that interesting elements and focal points should be on the intersecting points of a 3x3 grid.
In the following sig, the render's face and logo are on an intersecting point, as well as the text.
The main thing to note here is that you shouldn't put stuff in the dead centre.
1.2 - Depth
Depth in a sig is what makes it seem complete. To create depth, you will usually need a combination of stocks and effects.
In this sig, the foreground is the render and the some surrounding area. The background is a bit of the left and the rest of the right. The depth comes from the "bokeh" effect, or simple stated, the blur. An easy way to create depth is to make a layer on top of everything else when you're done, and Gaussian Blur it between 1px and 2px. Erase (or mask) the parts that you want to be in focus, mainly your render and the text.
2.0 - Stocks
Stocks, put simply, are photographs or digital images of anything that you put in your sig to make it look cool.
This is one of my sigs without the render or text.
Some of the stocks in there are splatters, c4ds, or lighting effects (Click those links to find thousands of examples.)
Other stocks include landscapes, patterns or just cool pictures.
Many often get messed up with the sort of blend modes they're supposed to use for a stock. Best advice here is to experiment, but the most common blend modes are Soft Light, Overlay, Screen/Lighten, Multiply/Darken and occasionally Color Burn/Color Dodge.
A good trick for when a stock is too intense is to play with its Levels instead of its Opacity. Hit Ctrl+L (Cmd+L) when you are on that layer and adjust the middle slider until it looks good. And never be afraid to erase ugly parts!
3.0 - Text
Text is often the biggest issue for sig makers. Many simply don't put in enough effort, and many don't know what effort to put in.
One simple thing to do is give it a background.
This will give the text some substance, and make it easier to read.
Don't be scared of hiding some of the text with the render. As long as it is still readable, it can work.
Never be afraid to spice up the text with some flare. Add a bunch of periods or 'x's. Maybe even some small gibberish that is just for aesthetics.
Final tip for text: always try multiple versions. Do three totally different attempts of text on each sig you do, with different fonts, spacing, effects, colouring etc. This is the number one way to improve your text.
4.0 - Assorted Techniques
4.1 - Displacement Maps
Duplicate your render. Go Filter > Distort > Displace. Hit OK or choose some different numbers. Locate an old .psd of yours. This will distort the render into some cool looking formations.
It might look weird here, but if you put it behind your render, it can give a nice effect.
4.2 - Gradient Maps
Seems pretty obvious for experienced sigmakers but it took me a long time to realise Gradient Map didn't mean use the Gradient tool. Hit the Black and White circle at the bottom of the layers panel and choose Gradient Map or go Layer > New Adjustment Layer > Gradient Map. A Gradient Map will map colours to your sig based on the light.
The render on the right has a purple to orange Gradient Map on it set to Soft Light. Mess around with different colours and blend modes to find some interesting effects.
4.3 - Shapes & Lines
Using polygons and lines is one of my favourite techniques. Draw the shape with the polygonal lasso tool or use the Shape Tool.
The triangles in this sig were made using the shape tool and various colours.
4.4 - Color Dodge Dots
Create a new layer and set it to Color Dodge. Choose a soft brush (circular) and set it anywhere from 15px - 100px. Turn on size jitter if you're feeling funky. Choose a color that is on the darker half of the spectrum (halfway down inside the colour picker window). Now just click a few times in spots that need some brightening up.
This.
To this.
(Also did some blurring to this one).
4.5 - Clipping Masks
Clipping masks are using in many different ways. You can use them to isolate an adjustment layer to just on layer, blend in splatter effects, create nice backgrounds or make nice text. Here are a few examples.
A clipping mask, in its basic form, has the colour of one layer aligned to the shape of another. The colour layer is on top of the shape.
In this example, the circle layer is beneath the army pattern layer. To create this, you make the circle layer directly underneath the army pattern layer. Then, right click on the army pattern layer and select 'Create Clipping Mask'.
In this example, the text has a clipping mask of the render.
While in this example, the splatters at the bottom-right and bottom-middle have clipping masks applied to them. The goal of this effect is to have it blend better with the rest of the sig.
Finally, in this sig the large circle is a clipping mask from the left side of the sig.
5.0 - Final Touches to Sigs
There are a few things that I do to nearly every sig I make. These are almost universal to sigs, and should improve many sigs.
Starting point:
5.1 - Hue Layer
Make a new Gradient Map. Make the first colour whatever colour suits your sig, and your second colour black or white (doesn't matter).
5.2 - Exposure Layer
Make a new Exposure layer (Layer > New Adjustment Layer > Exposure). My settings are: Exposure: 0, Offset: +0.0164, Gamma Correction: 0.89.
This makes the dark less overpowering.
5.3 - B/W Layer
Sometimes some coloured parts of a sig should grab less attention. An easy way to fix this is making that part black and white. Make a new layer and set it to Color. Brush in black anywhere that is drawing too much attention from it's color.
5.4 - High Pass
Make a new layer. Select all (Ctrl + A/Cmd + A) then hit Ctrl + Shift + C/Cmd + Shift + C to copy the entire sig. Then, paste it on the new layer (Ctrl + V/Cmd + V). Then go Filter > Other > High Pass and set it anywhere from 10px to 100px. Set this on Soft Light or Overlay and mess around with its Opacity.
5.5 - Blur
Finally, to create some depth, I again go through the steps of copying the whole sig and pasting it (another way to do this is making a new layer and going Image > Apply Image). Then I go Filter > Blur > Gaussian Blur and set it between 1px and 2px. Erase the render and text and other details that should remain sharp.
6.0 - Conclusion
Hopefully this helps some people in their sig making. If you have any questions or suggestions, feel free to reply. I will likely add to this later as well.
-
 jack got a reaction from MubbleFubbles in Jack's Guide to Making Neat Sigs
0.0 - Introduction
To begin, I'm not calling myself the god of sigs, but I do think I have improved a lot since my return to the VHL earlier this year. Hopefully this thread can help out some people struggling to consistently create nice sigs.
Here we go.
1.0 - Composition
The difference between a good sig and a fantastic sig often lies in its composition. That is, its layout of the elements, and its flow. There are a few key things to note in this category, and these things are easy to do.
1.1 - Rule of Thirds
The rule of thirds states that interesting elements and focal points should be on the intersecting points of a 3x3 grid.
In the following sig, the render's face and logo are on an intersecting point, as well as the text.
The main thing to note here is that you shouldn't put stuff in the dead centre.
1.2 - Depth
Depth in a sig is what makes it seem complete. To create depth, you will usually need a combination of stocks and effects.
In this sig, the foreground is the render and the some surrounding area. The background is a bit of the left and the rest of the right. The depth comes from the "bokeh" effect, or simple stated, the blur. An easy way to create depth is to make a layer on top of everything else when you're done, and Gaussian Blur it between 1px and 2px. Erase (or mask) the parts that you want to be in focus, mainly your render and the text.
2.0 - Stocks
Stocks, put simply, are photographs or digital images of anything that you put in your sig to make it look cool.
This is one of my sigs without the render or text.
Some of the stocks in there are splatters, c4ds, or lighting effects (Click those links to find thousands of examples.)
Other stocks include landscapes, patterns or just cool pictures.
Many often get messed up with the sort of blend modes they're supposed to use for a stock. Best advice here is to experiment, but the most common blend modes are Soft Light, Overlay, Screen/Lighten, Multiply/Darken and occasionally Color Burn/Color Dodge.
A good trick for when a stock is too intense is to play with its Levels instead of its Opacity. Hit Ctrl+L (Cmd+L) when you are on that layer and adjust the middle slider until it looks good. And never be afraid to erase ugly parts!
3.0 - Text
Text is often the biggest issue for sig makers. Many simply don't put in enough effort, and many don't know what effort to put in.
One simple thing to do is give it a background.
This will give the text some substance, and make it easier to read.
Don't be scared of hiding some of the text with the render. As long as it is still readable, it can work.
Never be afraid to spice up the text with some flare. Add a bunch of periods or 'x's. Maybe even some small gibberish that is just for aesthetics.
Final tip for text: always try multiple versions. Do three totally different attempts of text on each sig you do, with different fonts, spacing, effects, colouring etc. This is the number one way to improve your text.
4.0 - Assorted Techniques
4.1 - Displacement Maps
Duplicate your render. Go Filter > Distort > Displace. Hit OK or choose some different numbers. Locate an old .psd of yours. This will distort the render into some cool looking formations.
It might look weird here, but if you put it behind your render, it can give a nice effect.
4.2 - Gradient Maps
Seems pretty obvious for experienced sigmakers but it took me a long time to realise Gradient Map didn't mean use the Gradient tool. Hit the Black and White circle at the bottom of the layers panel and choose Gradient Map or go Layer > New Adjustment Layer > Gradient Map. A Gradient Map will map colours to your sig based on the light.
The render on the right has a purple to orange Gradient Map on it set to Soft Light. Mess around with different colours and blend modes to find some interesting effects.
4.3 - Shapes & Lines
Using polygons and lines is one of my favourite techniques. Draw the shape with the polygonal lasso tool or use the Shape Tool.
The triangles in this sig were made using the shape tool and various colours.
4.4 - Color Dodge Dots
Create a new layer and set it to Color Dodge. Choose a soft brush (circular) and set it anywhere from 15px - 100px. Turn on size jitter if you're feeling funky. Choose a color that is on the darker half of the spectrum (halfway down inside the colour picker window). Now just click a few times in spots that need some brightening up.
This.
To this.
(Also did some blurring to this one).
4.5 - Clipping Masks
Clipping masks are using in many different ways. You can use them to isolate an adjustment layer to just on layer, blend in splatter effects, create nice backgrounds or make nice text. Here are a few examples.
A clipping mask, in its basic form, has the colour of one layer aligned to the shape of another. The colour layer is on top of the shape.
In this example, the circle layer is beneath the army pattern layer. To create this, you make the circle layer directly underneath the army pattern layer. Then, right click on the army pattern layer and select 'Create Clipping Mask'.
In this example, the text has a clipping mask of the render.
While in this example, the splatters at the bottom-right and bottom-middle have clipping masks applied to them. The goal of this effect is to have it blend better with the rest of the sig.
Finally, in this sig the large circle is a clipping mask from the left side of the sig.
5.0 - Final Touches to Sigs
There are a few things that I do to nearly every sig I make. These are almost universal to sigs, and should improve many sigs.
Starting point:
5.1 - Hue Layer
Make a new Gradient Map. Make the first colour whatever colour suits your sig, and your second colour black or white (doesn't matter).
5.2 - Exposure Layer
Make a new Exposure layer (Layer > New Adjustment Layer > Exposure). My settings are: Exposure: 0, Offset: +0.0164, Gamma Correction: 0.89.
This makes the dark less overpowering.
5.3 - B/W Layer
Sometimes some coloured parts of a sig should grab less attention. An easy way to fix this is making that part black and white. Make a new layer and set it to Color. Brush in black anywhere that is drawing too much attention from it's color.
5.4 - High Pass
Make a new layer. Select all (Ctrl + A/Cmd + A) then hit Ctrl + Shift + C/Cmd + Shift + C to copy the entire sig. Then, paste it on the new layer (Ctrl + V/Cmd + V). Then go Filter > Other > High Pass and set it anywhere from 10px to 100px. Set this on Soft Light or Overlay and mess around with its Opacity.
5.5 - Blur
Finally, to create some depth, I again go through the steps of copying the whole sig and pasting it (another way to do this is making a new layer and going Image > Apply Image). Then I go Filter > Blur > Gaussian Blur and set it between 1px and 2px. Erase the render and text and other details that should remain sharp.
6.0 - Conclusion
Hopefully this helps some people in their sig making. If you have any questions or suggestions, feel free to reply. I will likely add to this later as well.
-
 jack got a reaction from Tbeez99 in Photoshop Alternative
https://www.photopea.com/
This is an in-browser Photoshop alternative. It has basically replicated all of Photoshop's features. You can even upload existing .psds. I'd recommend this over GIMP for sure.
-
 jack reacted to Motzaburger in VHLGFX S67 FINALS! FINALLY!
Shoutout to @jack for some sick graphics this competition. Congrats to the reigning champ for making it to the finals!
FINALS:
@gorlab vs. @.sniffuM
Each designer must make two (2) pieces once again.
First piece is a VHL mobile wallpaper, specifically for recruiting!
-Size: 2436 x 1125
- Must contain a player, the VHL logo, and recruitment text (e.g., "Join the VHL", or "Create your player today")
Second piece is a free for all. Make something we haven't seen before and wow us all.
Show us your best work for this second piece as there are no requirements except that it is VHL/M related.
Please PM me with your submissions by next Sunday!
GOOD LUCK!
-

-
jack reacted to .sniffuM in VHLGFX S67 SEMIFINAL VOTING
Fuck dude this one's tough. Both really good sets of graphics, B had the better player card imo but A's second graphic is the best of the round so I went with A.
-
 jack reacted to gorlab in VHLGFX S67 SEMIFINAL VOTING
Fuck being a gentleman, I'm voting for myself.
Good luck @jack -- You'll always be a winner in my eyes.
-
jack reacted to studentized in A look at a potential Western Europe roster
Yes, I know it's still VHL playoffs. Why are we talking World Cup already? Easy write-up, that's why.
In S66, Western Europe had 4 nations to choose from: Germany, France, Ireland, and the United Kingdom (technically already a collection of nations, but whatever). For S68 I think adding a few more countries to the list might make sense: Italy, Spain and/or Iceland would open up some more possibilities and make the team more competitive on a whole, especially defensively . Despite what I would like to see, for this write-up I will still assume nothing has changed from S66 and they will only have the four more typical western European nations to choose from.
To have any chance in this tournament, Western Europe is going to need to rely on its stifling defence and a bit of scoring luck. They lack high end talent outside of McWolf and Finn Davison but could medal with some smart roster decisions, good line chemistry, and some of that SHTS magic. Here's a breakdown of a potential roster for them.
Goalie
Easy decisions here. Finn Davison and J.B Rift represent the best goalies of the past two VHL seasons. Stable, veteran leadership from your goalies goes a long way in any tournament, especially in single-game elimination ones. This is the unquestionable strength of the team.
Defence
McWolf leads the way here and captains this ship. Picking a partner for him and the remaining D-pairing is where it gets more interesting.
Out of Ireland, two aging, regressing defensemen in Mulligan and Baxter would have once been easy picks. Now I think both have to be passed up on, unless the tournament opens up to allow a third pairing. They've had their chance in past world cups and there are plenty of equally talented, younger defencemen deserving of a chance.
In France, you have Fontenette who plays a well-rounded, not super flashy style of game. I think he slots in well with just about anybody, so I'd stick him on the second pairing.
Out of the U.K you get the remaining two guys; S68 rookie (and soon to be rookie of the year?) Lance Flowers and puck mover Codrick Past.
Flowers proved he could match against the best of the best this year and still hold his own. I really like him paired with McWolf but that leaves a Past/Fontanette second pairing that I'm not as sure about. In any case, I think you can get two good D pairings somewhere out of those four guys. Just might take some tinkering.
Centre
This is where it gets toughest for me. The three best eligible centres of the class all play a similar style; defence first, shoot second, pass third. Two of these guys are from Germany: Hans Gruber and Mark Gebauer. The other is Aston Martin from the UK. All of these guys are deserving of roster spots, but I think Martin and Gruber are the better candiates to take the draws for being slightly less one-dimensional. Gebauer should have no problem at wing, in fact, I like him better there.
Winger
By far this is the weakest position group, emphasized by the fact that you need to two per line. Denver Wolfe makes the first pick easy, representing the best forward available for Western Europe to choose from. It falls off a cliff after him though, so I think you probably have to stick Gebauer up with him on that top line.
The next best forwards West Europe has are two more S68 rookies; Irish winger Owen Nolan and UK centre Thorney Underyew. I've got the personal connection to Nolan, but to be honest I'm not sure how well he works without a pass first centre/opposite winger. Underyew plays a similar style which makes coming up with some good line chemistry all the more frustrating. Despite the possible lack of fit, I don't really see any alternatives outside of these two guys; the next best forwards are VHLMers who just don't have the experience desried.
Lineup
Gebauer @Sova - Martin @Sullvino - Wolfe @InstantRockstar
Underyew @jack - Gruber @TheFlash - Nolan @studentized
McWolf @McWolf - Flowers @CowboyinAmerica
Fontenette @okocha5 - Past @Kylrad
Davison @Poptart
Rift @Devise
It remains to be seen how the actual roster will shape up, but that is how I would do it (barring any extra countries being added to the candidate pool).
-
-

-
 jack got a reaction from .sniffuM in VHLGFX S67 Playoffs [R2] OrbitingDeath vs. .sniffuM
A went wild, that paint spilling/melting/fire effect is just on another level.
-
jack reacted to DoktorFunk in Seattle Bears Midseason Roster Rundown [1/2]
The Seattle Bears have been a surprise team in the VHL standings this season, in my opinion. Despite there not being any one rockstar player, the depth of their offense and defense has carried them pretty far. They definitely have a bright future ahead of them. But are all of their prospects growing as hoped? And how do they compare to their previous seasons? I am by no means a statistics guy, but let's take a look at each of their currently signed players and see how they’ve grown!
We’ll start alphabetically with:
Acyyyyyyd Burn (Totally a Bust)
One of the Captains of the Bears, Burn has so far performed up to expectations and then some. Last year, Burn had 22 goals and 32 assists over 72 games. As of this writing, he has 9 goals and 17 assists over 27 games. If we project this to the end of the 72 game season, Burn should outperform how well he did last year by a few goals and points. His growth seems to be continuing to advance his scoring ability. Overall, he continues to be a first-line forward and a valuable member of the Bears.
Ambrose Stark
One of the top defensemen on the Bears, Stark has continued his steady performance. In Season 67, Stark had 12 goals and 31 assists over the full season. So far, he has 3 goals and 17 assists. He is definitely more of a scoring presence, although he might end with fewer goals, he should have more points overall. With 44 shots blocked, he should continue helping out goalie Rayz Funk when it comes to stopping the opposing team’s momentum.
Berocka Sundqvist
The Thunda from Down Unda, Sundqvist has been an outstanding addition to the Bears. As one of the Season 68 rookies, Sundqvist doesn’t have any previous experience in the VHL, but was coming off of an astounding 100 point season in the VHLM. He has provided 13 goals and 12 assists so far for the Bears, and is one of their top scorers, a fact that hasn't been lost in his demeanor in the locker room recently. Expect to see Sundqvist on the ice a lot more as the season wears on.
Boone Jenton
Jenton hasn’t been a presence at all on the ice this season, and thus can be ruled a bit of a disappointment for the Bears. After having 13 points in the previous season, his 0 points this year is a bit sad. As we will see further into the list, Seattle has a few players taking up bench space that aren’t quite producing as they should. One of the few players on Seattle that seems to have lost their fire for the game, Jenton probably won’t be on the Bears roster for much longer, and definitely not in a prominent role if so.
Carles Puigdemont
Similar to Boone Jenton, Puigdemont has lost a bit of his zeal for the game in Seattle, but has been far more effective. Currently sitting as one of the Top 2 defensemen for Seattle along with Hulk Hogan, Puigdemont has 4 goals and 13 assists over the season so far. This is very much in keeping with his last season where he had 11 goals and 25 assists. He has yet to really advance beyond his level though, so expect to see him drop down the lines as Hogan and Stark improve their game.
Henrik Zoiderberg
One of the other rising and talented left wingers on the team, Zoiderberg has distinguished himself so far with outstanding games and performances. Zoiderberg has 20 points this season, with 9 goals and 11 assists. At this rate, he should FAR exceed last seasons 30 points. Zoiderberg happens to also be a very important figure on the team, as he is an active and excited member of the locker room, Zoiderberg should stick around on Seattle for a good amount of time. Why not Zoiderberg, indeed?
Heavyweight Champion of the World, Hulk Hogan
The champ is going strong, brother brother. Compared to his 43 points last year, Hogan has 2 goals and 22 assists, showing amazing growth so far. Not too bad for Seattle’s resident goon. Hogan should be a Hall of Fame defensive player if his career continues on the trajectory that it has taken. As long as he can stay off the juice and not get too steroided up that the VHL starts to question it, expect Hogan to be leg dropping goalies on Seattle for the rest of time, brother.
John Frostbeard
A mid-season acquisition from Calgary, Frostbeard has really found his own and settled in to be an amazing team player in Seattle. Beloved by his teammates, his is not just a nice locker room presence. Frostbeard has 28 points with 10 goals and 18 assists, half of his 56 points from last season in only 27 games. Frosty is expected to exceed his performance and be a very dominant presence on the ice. His kind, calm, and collected attitude lends itself well to the Seattle Bears locker room and he adds a lot to the team.
Kevin Low
Consistently getting better and contributing to the team, albeit a quite player, Kevin Low has put up quite a few points for the Bears, and is looking to exceed his 38 point rookie season. He is constantly improving, so his performance improving shouldn’t be too much of a surprise. Low has already taken more than half of the shots on net that he did last season, so expect a bunch more of those to find home. His numbers won’t stay Low for long.
Maxim Kovalchuk
The first line center for Seattle, and formally a Hall of Fame talented defensive player, Kovalchuk filled a hole in the Bears offense that was very needed. He put up 78 points for the Bears last season, and seems to be slowing down a little bit this season. This is to be expected, as Kovalchuk is sitting a little bit on the older side for players in the Victory Hockey League. Still, he’s filling a very necessary position on Seattle while it figures out what to do and where to look for it’s new center, which is an important question going forward for the Seattle Bears.
Scott Greene
Speaking of the future of Seattle Bears centers, we come to Scott Greene, the second line center for the Bears. Greene had a decent first year for a rookie, putting up 53 points over 72 games. The Bears need a talented center, but Greene hasn’t been quite as impressive so far this year. He’ll need to step his game up, particularly in the face-off circle so that his team can keep possession of the puck more. A little more muscle on his frame should reap some rewards, so expect him to be hitting the gym a little bit more this season. Greene isn’t the perfect player, but even still, the future does look bright for Greene if he can address this issue.
Shane Mars
One of the great sad stories for the Bears, Mars just doesn’t have the same fire in his game that Seattle was hoping for when he was drafted in season 66. Not enough can be said about Shane Mars from two seasons ago. After coming off of an unbelievable rookie season, Mars put up 60 points for Seattle over 72 games. Not bad, but not what they were hoping for. He’s done very little for the Bears in season 68, and doesn’t look to be doing much more in the near future.
Thorny Underyew
Another one of the rookies for the Seattle Bears, Underyew has put up 8 points at the time of writing, and looks to keep contributing to the bottom six for Seattle. Overall, should be a good player going forward.
Rayz Funk
In my opinion, the backbone of the Seattle Bears and their star player, no offense to anyone else. Rookie of the Year winner and a franchise goalie for Seattle, Funk will absolutely be a Hall of Fame player in the future. The tough part is gauging his performance this year. His save percentage is looking better, and it’s actually the highest it’s ever been as of the writing of this article. He has half of the wins he had from last season, and if the team in front of him can stay consistent, he should be golden.
This team has a very bright future ahead of it. I think this Seattle team could be one of the strongest teams in the Victory Hockey League, and if all of the players can stick around, they could be contenders for their entire careers. The issue is going to be addressing payment. All of the Season 67 draftees for Seattle have remained active and around, and have been constantly improving. Seattle isn’t going to have much cap space after season 69, so Banackock will need to take a hard look at the roster and see what pieces he can keep around.
@Acydburn @Banackock @berocka @HenrikZoiderberg @Rayzor_7 @jack @Smarch @FrostBeard @HulkHogan
Sorry if I missed everyone.
1500+ words, claiming for the next three weeks
-
jack reacted to gorlab in VHLGFX S67 Playoffs [R2] jack vs. Bushito
yeesh this would have put any graphic in round 2 in a casket imo.
Smart move, Bushito.
-
jack reacted to Motzaburger in VHLGFX S67 Playoffs [R2] jack vs. Bushito
That's why I liked picking a theme that made you fellas switch it up from the norm more things to come next round! Keep it up boys
-
jack reacted to .sniffuM in VHLGFX S67 Playoffs [R2] jack vs. Bushito
It's insane how well everyone did on these, sucks that Bush didn't get one in but this one is great like everything else submitted.
-
-
-
jack reacted to STZ in brocklouth
@Beaviss
Remember: All S69 Players can claim one of these if hit 150 TPE! READ HERE
-

-

-